Bringing Spring Indoors: A Practical Guide to the Crocus Planter SVG
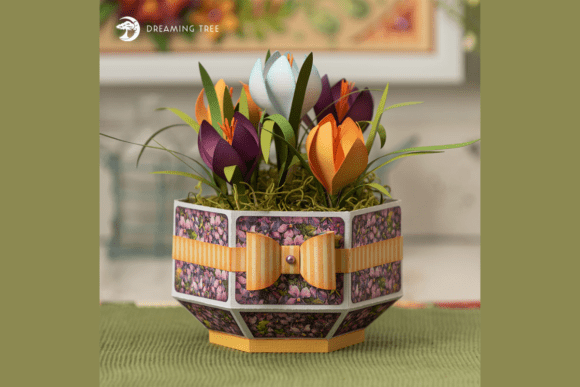
There is a distinct joy in crafting something that captures the fleeting beauty of the season. The Crocus Planter SVG offers a perfect solution for those who want to celebrate the fresh vibrancy of spring without the worry of wilting blooms. This digital design features realistic paper crocus flowers arranged in a charming three-dimensional planter box, creating a centerpiece that serves as a lasting gift or a cheerful addition to your home workspace. However, jumping into a new paper crafting project often comes with hidden pitfalls. Whether you are a seasoned entrepreneur selling handmade goods or a beginner looking for a relaxing weekend hobby, understanding the nuances of this specific file format can save you time, materials, and frustration.
At its core, this project is about layering. Each flower is designed with multiple pieces to create dimensional detail, supported by leafy stems and a rustic-style base. While the concept sounds straightforward, the execution relies heavily on preparation. One of the most common misunderstandings involves the file formats themselves. Many crafters assume that purchasing an SVG guarantees compatibility with every machine or software package they own. In reality, while this design is fully compatible with all SVG-ready cutting machines and software intended for 12×12 mats, issues arise when users attempt to import these files into programs that do not natively support scalable vector graphics without conversion. Always verify that your cutter's software is updated before you begin to avoid corrupted paths or missing layers.
Avoiding Material Miscalculations
The supply list for this project is specific for a reason, yet it is frequently overlooked by eager crafters who substitute materials based on what they have lying around. The design calls for two sheets of 12x12 white cardstock alongside various 8.5x11 sheets in colors like Brown Sugar, Carrot, Sunflower, Leaf, Spinach, and Grape. A frequent mistake is using standard printer paper or lightweight cardstock for the structural elements, particularly the planter box. Because the final dimensions are approximately 8 inches high, 6.5 inches wide, and 5 inches deep, the base requires rigidity to hold the weight of the layered blooms. If you use paper that is too thin, the planter may warp or collapse, ruining the presentation.
Conversely, using cardstock that is too heavy can be just as problematic. If your machine struggles to cut through thick material, you risk tearing the delicate petals of the crocus flowers, which require precision to maintain their realistic look. The sweet spot is usually 65lb to 80lb cardstock. Another oversight involves the patterned paper. The list includes a striped pattern sheet, which adds visual interest to the planter box. Beginners often cut this piece from solid color stock instead, missing the textural contrast that makes the "rustic" aesthetic pop. Before you hit cut, lay out your materials against the PDF legend included with the download. This simple step ensures you have the correct color weight and texture for every single layer.
The Importance of the Assembly Sequence
Even with perfect cuts, the assembly process can trip up even experienced makers if they rush. The Crocus Planter SVG is designed with complexity in mind; each flower is layered for depth. A common error is attempting to glue all the petals down at once or ignoring the curvature needed for a 3D effect. Without proper shaping tools—like a quilling tool or even the barrel of a pen—the flowers will look flat and lifeless, failing to achieve the "realistic" promise of the design. Take the time to curl the edges of each petal slightly before adhering them. This small adjustment transforms a two-dimensional cutout into a blooming flower.
Furthermore, the inclusion of a step-by-step video tutorial is a vital resource that many users neglect. Relying solely on static images can lead to confusion regarding which tab folds where, especially on the planter box construction. The box utilizes interlocking tabs to create its depth without excessive glue, a clever engineering feature that is easily missed if you do not follow the visual guide. Ignoring the tutorial often results in a wobbly base or visible glue stains, detracting from the professional finish. Watch the video through once before touching your glue gun to understand the flow of assembly.
Resizing and Scaling Considerations
Flexibility is a key selling point of digital designs, and you can resize this project to fit your specific needs. However, this freedom comes with a caveat that is often ignored: proportional scaling. When you enlarge the design significantly beyond its original 8x6.5x5 dimensions, the structural integrity of the paper tabs may become compromised. Tabs that were designed to hold a small box might be too flimsy to support a giant version, leading to a structure that falls apart. Conversely, shrinking the project too much can make the intricate layering of the crocus petals impossible to assemble by hand.
If you intend to sell these as products for Mother's Day or Easter, consistency is key. Changing the size arbitrarily between batches can lead to inventory issues with your material usage. Calculate exactly how many flowers you can get from a single sheet of cardstock at your chosen scale before committing to a large production run. This prevents waste and ensures your cost margins remain healthy. Remember, the final dimensions may differ slightly from the original depending on your machine's calibration, so always do a test cut on scrap paper first.
Making the Right Choice for Your Skill Level
This project strikes a balance between accessibility and challenge, making it suitable for a wide range of creators. However, it is not necessarily a "five-minute craft." The sheer number of pieces involved means that organization is paramount. A lack of organization is the silent killer of complex paper projects. Without a system to sort the dozens of petals, leaves, and box panels, you may find yourself hunting for specific shades of green or purple mid-assembly, breaking your workflow and increasing the likelihood of errors.
To mitigate this, use the handy PDF legend provided with the download not just as a reference, but as a checklist. Sort your cut pieces by color and component type before you begin gluing. For entrepreneurs, this level of organization is the difference between a profitable batch and a lost afternoon. For hobbyists, it turns a potentially stressful experience into a meditative one. By respecting the complexity of the design and preparing your workspace accordingly, you ensure that the final result is a stunning display of handmade floral cheer.
Ultimately, the Crocus Planter SVG is more than just a file; it is an invitation to create something enduring. By paying attention to material weights, following the assembly tutorials, and respecting the scaling limitations, you avoid the common frustrations that plague paper crafting. Whether you are brightening up your own desk or creating heartfelt gifts that last far longer than fresh flowers, the effort you put into the details will shine through in the final bloom. Embrace the process, trust the design, and let your workspace flourish with the colors of spring.