DIY Christmas Paper Lantern with Angels
There is a distinct quietude that settles over a home when the only light comes from within. It is not the harsh glare of overhead fixtures, but the soft, rhythmic glow of a candle or an LED bulb filtered through paper. Creating a Christmas Paper Lantern with Angels is more than just a holiday craft; it is an exercise in patience, precision, and the joy of making something tangible that brings warmth to your space. Whether you are a seasoned designer looking for a new project, a small business owner seeking unique decor ideas, or a hobbyist wanting to personalize your home, this paper cutting handicraft offers a perfect blend of tradition and modern customization.
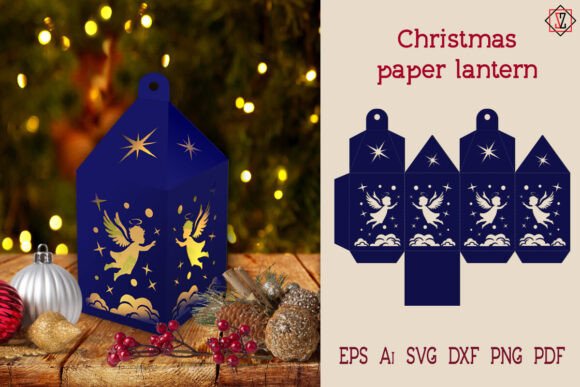
The specific design we are exploring features delicate angel silhouettes that come to life when illuminated. The finished lantern, complete with its pendant, stands approximately 20cm tall. This size is ideal for hanging in windows, placing on mantelpieces, or suspending above a dining table. Because the design relies on negative space—the parts you cut away rather than the parts you keep—it transforms a flat sheet of A3 paper into a three-dimensional object full of depth and shadow play. The beauty of this project lies in its scalability; while the standard template fits A3 paper, you can easily enlarge or reduce the design to suit different spaces or materials without losing the integrity of the angel figures.
The Art of Light and Shadow
Paper cutting, or scherenschnitte, has roots in cultures worldwide, but its application in holiday decor feels particularly timeless. When you work with a Christmas candle holder stencil, you are essentially painting with light. The thickness of the paper, the sharpness of your cuts, and the intensity of your light source all dictate the final mood. A thicker cardstock will cast harder, more defined shadows, creating a dramatic effect, while thinner paper allows for a softer, more ethereal glow that makes the angels appear to float.
For those interested in the technical aspects, the versatility of modern digital files enhances the traditional craft. Today, you are not limited to printing a static image and cutting by hand with an X-Acto knife, although that remains a rewarding method. The availability of vector files means you can adapt this project for various tools. If you own a digital cutter like a Cricut or Silhouette, or even a laser cutter for more advanced prototyping, the design can be imported directly. File formats such as AI, EPS, SVG, and DXF ensure compatibility with almost any software or hardware you might use. This bridges the gap between hand-made aesthetics and digital precision, allowing creators to produce multiple units consistently—a crucial factor for educators teaching a class or entrepreneurs selling at holiday markets.
Adapting the Design for Different Contexts
One of the strongest arguments for using a downloadable template with multiple file types (including high-resolution PNGs at 300 dpi) is the freedom it grants the creator. You are not stuck with one interpretation of the angel motif. Consider how different users might approach this:
- Home Decorators: Use warm-white LED candles to create a cozy atmosphere in a living room. The 20cm height is substantial enough to be a focal point but small enough to fit on a crowded shelf.
- Educators and Workshop Leaders: The outline template with a transparent base is perfect for teaching. Students can trace the design onto colored paper, tissue paper, or even vellum to experiment with translucency.
- Small Business Owners: Produce these lanterns as limited-edition holiday gifts. The ability to scale the design means you can create matching sets of varying sizes for gift baskets.
- Photographers and Content Creators: Use the lantern as a prop. The intricate cutouts provide excellent texture for product photography or holiday-themed social media content.
The key to success in any of these applications is preparation. When downloading the package, you typically receive both a color version for visualization and a pure outline template for cutting. Always print a test page on standard printer paper first. This allows you to check the scale and ensure that the intricate details of the angels' wings and robes are large enough to cut without tearing. Remember, the connections between the cut-out areas and the main body of the paper must remain intact to hold the structure together.
Practical Steps for a Professional Finish
To achieve a result that looks polished rather than amateurish, attention to detail during the assembly process is paramount. Start by selecting the right paper. A weight of 160gsm to 200gsm is generally the sweet spot for paper lanterns; it is sturdy enough to hold its cylindrical shape but thin enough to let light pass through effectively. If you are using a digital cutter, ensure your blade is sharp and calibrated for the specific weight of your material.
Safety is also a primary consideration, especially when dealing with open flames. While traditional wax candles offer a flickering authenticity, they pose a fire risk inside a paper enclosure. It is highly recommended to use LED candles. Modern LED tea lights mimic the flicker of real flame remarkably well and generate no heat, ensuring your paper lantern remains safe to touch and leave unattended for short periods. This makes the lantern suitable for homes with children or pets, expanding its usability.
Assembly usually involves rolling the cut sheet into a cylinder and securing the ends. Some templates include tabs for gluing, which provide a cleaner finish than taping. If your template does not have tabs, use a strong double-sided tape or a thin line of craft glue hidden on the interior seam. For the top and bottom, you may need to create a separate base and lid, or simply fold the edges inward if the design permits. The pendant mechanism should be reinforced; consider using a strong thread or a thin wire looped through a reinforced hole at the top center to support the weight of the lantern.
Exploring Creative Variations
Once you have mastered the basic construction of the Christmas Paper Lantern with Angels, the possibilities for variation are endless. Why stick to white paper? Try using deep midnight blue cardstock to simulate a night sky, where the cut-out angels appear as stars. Alternatively, use gold foil paper for a luxurious, festive look that catches the light dynamically. You can also layer two lanterns: a larger outer shell with a simple geometric pattern and this inner angel-themed shell, creating a complex interplay of shadows.
For those who enjoy mixed media, consider adding subtle watercolor washes to the paper before cutting. A faint gradient of orange and pink behind the angels can evoke a sunrise or sunset, adding emotional depth to the piece. If you are creating these for a specific brand or event, the scalable nature of the vector files allows you to incorporate logos or specific dates subtly into the border design without disrupting the angel motif.
The process of making these lanterns is meditative. In a world dominated by screens and digital notifications, the act of physically cutting paper, folding, and assembling provides a grounding experience. It reconnects us with the tactile nature of creation. Whether you are making one for your own home or dozens for a community event, the result is a beacon of light that says something personal about the maker.
Ultimately, the value of this project extends beyond the final object. It is about the intentionality of decorating your space. A store-bought ornament is convenient, but a handmade lantern carries the energy of the time and care invested in it. As you hang your finished 20cm lantern, watch how the light shifts throughout the evening. The angels, static in the day, seem to dance in the glow of the candle, bringing a sense of peace and wonder to your Christmas interior. This is the power of simple materials combined with thoughtful design—a reminder that the most beautiful things often start with a single sheet of paper and a willingness to create.