Craft a Retro Classic Joystick SVG Gift Box
There is something undeniably charming about the golden age of video games. For many, the simple click of a plastic button and the resistance of a sturdy stick evoke memories of Saturday mornings and high-score chases. Bringing that nostalgia into the physical world doesn't require expensive electronics or complex machinery. With a Classic Joystick SVG file, you can transform flat sheets of paper into a functional, three-dimensional piece of art that honors the 8-bit era. This project bridges the gap between digital design and tangible crafting, offering a unique way to celebrate gaming history while creating something practical for your desk or a friend's shelf.
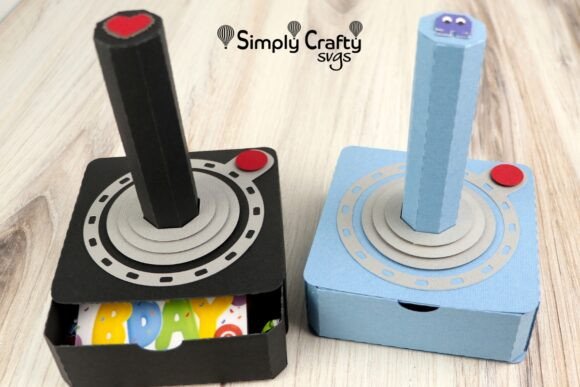
At its core, this project is more than just a model; it is a cleverly engineered gift box. The design mimics the iconic silhouette of vintage Atari-style controllers, complete with a tall 3D stick and a classic action button. However, the real magic lies in its utility. The base of the joystick features a fully functional slide-out drawer. This hidden compartment makes the finished piece an excellent vessel for secret storage. Whether you are hiding a gift card, small handheld gadgets, extra gaming accessories, or even favorite snacks like candy and nuts, the drawer provides a delightful surprise for the recipient. It turns a standard present into an experience, effectively "leveling up" the act of giving.
Why This Papercraft Project Stands Out
Many paper crafts result in fragile decorations that collect dust. The Classic Joystick Box differs because it is built for durability and display. Engineered to stand upright, the finished dimensions measure approximately 4.5 inches by 4.5 inches with a height of 6 inches. This substantial footprint ensures it remains stable on a desk, bookshelf, or entertainment center without tipping over. It serves as a conversation starter in an office or a nostalgic accent in a dedicated gaming room.
The appeal extends beyond the final product to the creation process itself. We have designed the assembly to be accessible for crafters of all skill levels. Even if you have never worked with SVG files before, the included step-by-step video tutorial guides you through every fold and glue point. You don't need to be a professional designer to achieve professional results. The instructions break down the construction into manageable steps, allowing you to craft with confidence. This supportive approach removes the intimidation factor often associated with 3D papercraft, making it an ideal weekend project for beginners and a relaxing activity for experienced hobbyists.
Ideal Materials for a Sturdy Build
To ensure your joystick stands the test of time, material selection is crucial. While standard printer paper might work for a quick prototype, it lacks the structural integrity needed for a functional drawer and a standing display piece. For the best results, we recommend using textured cardstock. Specifically, three sheets of 12-inch by 12-inch cardstock, such as American Crafts AC Textured Cardstock, provide the perfect balance of flexibility and rigidity.
The texture of the cardstock adds a tactile quality that mimics the feel of vintage plastic hardware, enhancing the retro aesthetic. In addition to the main body, you will need basic adhesives. A good quality glue ensures clean seams, while foam tape is essential for creating depth and securing moving parts like the drawer mechanism. If you plan to add smaller hardware details or internal reinforcements, smaller pieces of paper can be utilized effectively. The SVG files are versatile and compatible with letter-size materials if you choose to ungroup the elements, giving you flexibility if you don't have access to 12x12 sheets.
Versatile Uses Beyond Gaming
While the Classic Joystick SVG is naturally suited for gamers, its applications stretch far beyond a single hobby. For small business owners and entrepreneurs, this design offers a creative packaging solution. Imagine a boutique shop selling retro-themed merchandise or artisanal candies; placing their products inside this custom box adds immense perceived value and brand personality. It transforms a simple transaction into a memorable unboxing moment that customers are likely to share on social media.
Educators and teachers can also leverage this project in the classroom. It serves as an engaging tool for teaching geometry, spatial reasoning, and following technical instructions. Students can learn about 3D structures by assembling the box, discussing how 2D shapes fold into 3D objects. Furthermore, it opens up discussions about the history of technology and design evolution, connecting art class with computer science history.
For content creators and bloggers, building and documenting this process provides rich material for tutorials, time-lapse videos, and lifestyle posts. The visual appeal of the finished joystick is high, making it photogenic for Instagram or Pinterest. Freelancers looking to expand their portfolio can use this project to demonstrate their ability to work with digital cut files and physical prototyping, showcasing a blend of digital and manual skills to potential clients.
Important Considerations Before You Start
Before diving into your cutting machine or printing your files, there are a few practical things to consider to ensure success. First, verify your machine settings. Different brands of cardstock have varying thicknesses, so it is wise to run a test cut on a scrap piece of your chosen material. This prevents tearing or incomplete cuts, which can be frustrating during assembly. Since the drawer needs to slide smoothly, precision is key.
Secondly, think about your color scheme. While the classic black and grey palette is authentic to the 8-bit era, the Classic Joystick SVG allows for customization. You could match the box to a specific room's decor, create a version in bright neon colors for a synth-wave look, or replicate the color scheme of a specific console you loved as a child. The digital nature of the file means you can easily adjust colors in your design software before cutting.
Finally, allocate enough time for drying. Because this is a 3D structure with multiple glued joints, rushing the assembly can lead to warping or misalignment. Allow the glue to set properly between major steps, especially when attaching the stick and the drawer mechanism. Patience during the build process guarantees a sturdy final product that functions exactly as intended.
Whether you are looking for a heartfelt handmade gift, a unique storage solution for your workspace, or a fun project to sharpen your crafting skills, this retro-inspired design delivers on all fronts. It captures the spirit of vintage gaming while providing a modern, functional utility that fits seamlessly into today's creative lifestyles.